Hi,
Do you recommend using the lazy load on all the sections that have photos?
When is it recommended to enable, the whole sections or on each photo separately?
Is there a recommendation for a photo size limit with and without the lazy load?
For example, if I enabled the lazy load on a section so the quality of the photos could be better?
What is the recommended total size of a page in megabytes that is recommended for indexing score?
What is the recommended size of photos?
512 kb for a photo okay or should be less?
Does lazy load affect the score of websites or google doesn’t count it?
Is it better to resize an image to the section tags or to keep the maximum size of the photo and compress it?
What will store a better-quality of the image?
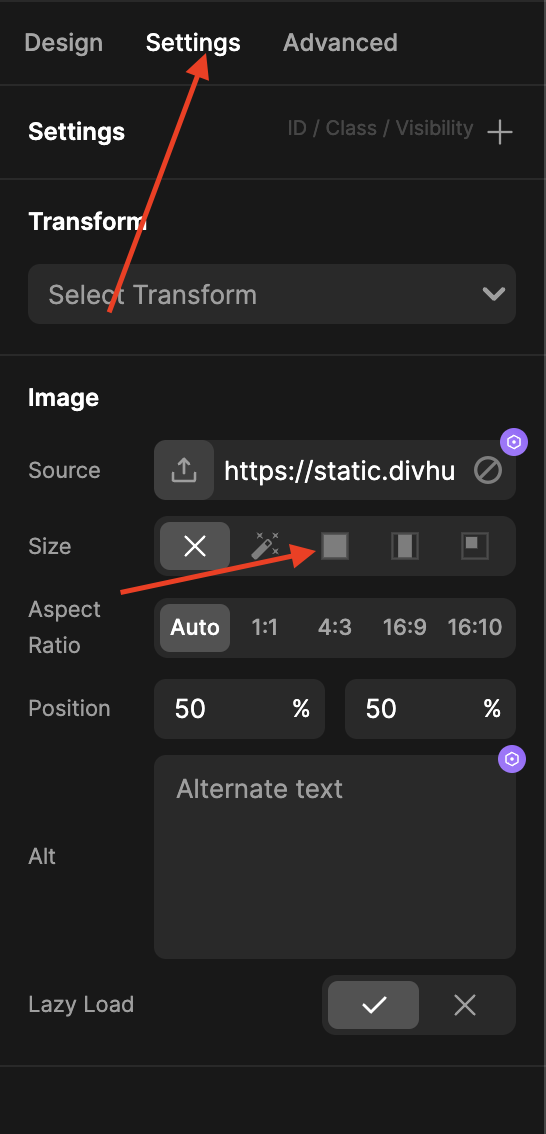
In Divhunt there is the option to resize the image with the width and height.
Is it recommended or better to compress or resize the image before?
When I use the lazy load, not all the website is uploaded so what is the total size of images in 1 section?
If I have 4 images, is it recommended that with the lazy load, they have 1 mg of size?
Looking to find the best way to keep the image quality without causing the website to be very slow.
Lazy Load: Typically, you’d want to lazy load all images except those in the primary position at the top of the website page (such as the header/hero section). This ensures they’re displayed instantly to the user.
As for image optimization, the best approach is to export it in the exact size you intend for it to appear. You can resize it using free tools like Figma or Photopea. After resizing, optimize it for the web using this tool: https://tinypng.com/
Bonus Tips:
-
Avoid using PNG for your regular images. Instead, always aim to export everything as JPEG because it’s more compressed. One trick I personally like? If I’ve got an image with no background and the website’s background color is white, I just export that image/asset with a white background as a JPEG.
-
Image size really depends on the image itself. But as a general rule, anything up to 400Kb is golden. For those big images (talking 1440px width and beyond), getting below 400Kb can be a tough game. So, everything up to 1MB is fine.
-
Personally, I often export images at 2x the required size. For instance, if I need an image to be 500x200, I’ll export it as 1000x400. The reason is that retina displays have 2x pixel density, and some images can appear slightly blurry on them. By using the 2x size, you’re essentially allowing the image to display more pixels, making it crisper on such screens.
3 Likes
@Stolichnaya I added 2 more tips in my comment, it should help you out with image optimization.
1 Like
Thank you SO much @Lazarevic
I highly appreciate your tips!
1 Like
I have found that images with 5044 × 3363 px, for example, look worse after I resize them even with X2 for example to 1034 × 1062 which is double the size of the image wrapper.
If I keep the original image dimensions and only reduce the file size to under 1 MB, it looks better.
The original image size is 15 MB.
I guess it is good to explore both ways to see what is better without damaging the natural look of the image.
You need to set Size to Cover in the settings panel of an image, so it doesn’t get stretched like that.
1 Like